CakePHP is an open source web application framework of PHP. Although our institute’s PHP Master Course covers it very well yet I decided to write an useful article on CakePHP for many of the beginners and our PHP students. CakePHP framework provides a robust base for advanced applications written in PHP. It can handle every aspect, from the user’s initial request all the way to the final rendering of a web page. The framework also provides a basic organizational structure, from filenames to database table names, keeping your entire application consistent and logical.
It follows the Model-View-Controller (MVC) approach and is written in PHP. And since the framework follows the principles of MVC, it allows you to easily customize and extend most aspects of your application. This concept is simple but powerful. Follow the conventions and you’ll always know exactly where things are and how they’re organized.
CakePHP started in April 2005, when a Polish programmer Michal Tatarynowicz wrote a minimal version of a Rapid Application Framework in PHP, dubbing it Cake. He published the framework under the MIT license, and opened it up to the online community of developers. In December 2005, L. Masters and G. J. Woodworth founded the Cake Software Foundation to promote development related to CakePHP. Version 1.0 was released on May 2006.
CakePHP Installation
Here are the steps to install & configure CakePHP on your localhost Wamp. I am using Wamp Server as the web server but, it will remain same in XAMPP & many other Apache Based web servers as well because all those are building based on apache core. So, the configurations are mostly same as Wamp Server.
Step1 – Go to CakePHP Website http://CakePHP.org/ and Download updated Cake PHP and unzip the file.
Step2 – Create new Database on phpMyAdmin.
Let’s set up the database for our blog. Right now, we’ll create a single table to store our posts. We will add few records of our posts in order to test the process.
/* First, create our posts table: */
CREATE TABLE posts (
   id INT UNSIGNED AUTO_INCREMENT PRIMARY KEY,
   title VARCHAR(50),
   body TEXT,
   created DATETIME DEFAULT NULL,
   modified DATETIME DEFAULT NULL
);
/* Then insert some posts for testing: */
INSERT INTO posts (title,body,created) VALUES ('The title', 'This is the post body.', NOW());
INSERT INTO posts (title,body,created) VALUES ('A title once again', 'And the post body follows.', NOW());
INSERT INTO posts (title,body,created) VALUES ('Title strikes back', 'This is really exciting! Not.', NOW());
Step3 – Copy the downloaded folder in wamp folder: C->www->wamp->(cakefolder).
Step4 – Now Go to (cakefolder)->app->Config->database.php.defult and rename it as database.php
Step5 – Some changes requires in database.php file
public $default = array(
   'datasource' => 'Database/Mysql',
   'persistent' => false,
           'host' => 'localhost',
   'login' => 'root',
   'password' => '',
   'database' => ' CakePHP-learn',
   'prefix' => '',
   //'encoding' => 'utf8',
)
public $test = array(
   'datasource' => 'Database/Mysql',
   'persistent' => false,
   'host' => 'localhost',
   'login' => 'root',
   'password' => '',
   'database' => 'cake_test',
   'prefix' => '',
   //'encoding' => 'utf8',
)
Step6 – Now open (cakefoler)->app->Config->core.php and change the values of the Security.salt and Security.cipherSeed
Default they were like,
Configure::write('Security.salt', 'DYhG93b0qyJfIxfs2guVoUubWwvniR2G0FgaC9mi');
Configure::write('Security.cipherSeed', '76859309657453542496749683645');You can change the code as per your preference
Configure::write('Security.salt', 'gk5454545fsdfUEsdfsbDsdh');
Configure::write('Security.cipherSeed', '54548785454521');Step7 – Make sure the (cakefolder)->tmp is writable and apache mod_rewrite is enabled.
Step8 – Open the browser and type: http://localhost/(cakefolder)/ and that’s up. You’re Done..!

Step9 – In case if you don’t get the result as above that means you are having issue with mod_rewrite. You will face the error of “URL rewriting is not properly configured on your server.”
Follow the terms given into this URL http://book.CakePHP.org/2.0/en/installation/url-rewriting.html
How to Work with CakePHP?
Step1 – Create a Post Model
The Model class is the most important part of CakePHP applications. By creating a CakePHP model that will interact with our database. This interaction will provide us authority to update, view, add, and edit application.
CakePHP’s model class files go in /app/Model, and the file we’ll be creating will be saved to /app/Model/Post.php
class Post extends AppModel {
}
Naming conventions are very important in CakePHP. By naming our model Post, CakePHP can automatically infer that this model will be used in the PostsController, and will be tied to a database table called posts.
Step2 – Create a Posts Controller
Next, we’ll create a controller for our posts. The controller is where all the business logic for post interaction will happen. It’s the place where post-related work done. We’ll place this new controller in a file called PostsController.php inside the /app/Controller directory.
Now, let’s add an action to our controller. Actions often represent a single function or interface in an application. Add new public function to the controller.
class PostsController extends AppController {
   public $helpers = array('Html', 'Form');
   public function index() {
      $this->set('posts', $this->Post->find('all'));
   }
}
Step3 – Creating Post Views
Now we have our data to our model, let’s create a view for the index action. Remember how we assigned the ‘posts’ variable to the view using the set() method?
CakePHP’s view files are stored in /app/View inside a folder named after the controller to which they correspond. (We’ll have to create a folder named ‘Posts’ in this case.)
<!– File: /app/View/Posts/index.ctp –>
<h1>Blog posts</h1>
<table>
   <tr>
      <th>Id</th>
      <th>Title</th>
      <th>Created</th>
   </tr>
   <em><!-- Here is where we loop through our $posts array, printing out post info --></em>
   <?php foreach ($posts as $post): ?>
   <tr>
      <td><?php echo $post['Post']['id']; ?></td>
      <td>
         <?php echo $this->Html->link($post['Post']['title'], array('controller' => 'posts', 'action' => 'view', $post['Post']['id'])); ?> </td>
      <td><?php echo $post['Post']['created']; ?></td>
   </tr>
   <?php endforeach; ?>
   <?php unset($post); ?>
</table>
Now we are able to see the posts localhost/(cakefolder)/posts/index

If you clicked on one of the link where URL is /posts/view/some_id), you have to define an action. In this case we’ll create it in the PostsController
// File: /app/Controller/PostsController.php
class PostsController extends AppController {
   public $helpers = array('Html', 'Form');
   public function index() {
      $this->set('posts', $this->Post->find('all'));
   }
   public function view($id = null) {
      if (!$id) {
         throw new NotFoundException(__('Invalid post'));
      }
      $post = $this->Post->findById($id);
      if (!$post) {
         throw new NotFoundException(__('Invalid post'));
      }
      $this->set('post', $post);
   }
}
Now create the view for our new ‘view’ action and place it in /app/View/Posts/view.ctp
<!-- File: /app/View/Posts/view.ctp -->
<h1><?php echo h($post['Post']['title']); ?></h1>
<p><small>Created: <?php echo $post['Post']['created']; ?></small></p>
<p><?php echo h($post['Post']['body']); ?></p>
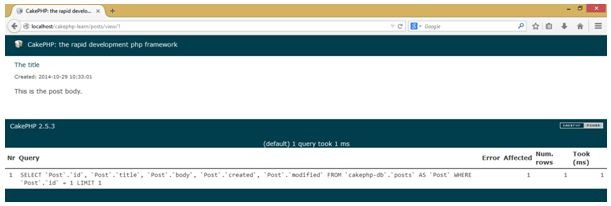
Now click on any link you’ll get the above page.
Step4 – Adding Posts in our Blog
First, create an add() action in the PostsController
public function add() {
   if ($this->request->is('post')) {
      $this->Post->create();
      if ($this->Post->save($this->request->data)) {
         $this->Session->setFlash(__('Your post has been saved.'));
         return $this->redirect(array('action' => 'index'));
      }
      $this->Session->setFlash(__('Unable to add your post.'));
   }
}
Step5 – Data Validation
<!– File: /app/View/Posts/add.ctp –>
<h1>Add Post</h1>
<?php
   echo $this->Form->create('Post');
   echo $this->Form->input('title');
   echo $this->Form->input('body', array('rows' => '3'));
   echo $this->Form->end('Save Post');
?>
Now we have our validation rules in place, we can try to add a post with an empty title or body to see how it works. Check the URL: localhost/CakePHP-learn/posts/add

Step6 – Editing Posts
Make the action, then the view. Add edit() action to the PostsController for updating an existing post.
public function edit($id = null) {
   if (!$id) {
      throw new NotFoundException(__('Invalid post'));
   }
   $post = $this->Post->findById($id);
   if (!$post) {
      throw new NotFoundException(__('Invalid post'));
   }
   if ($this->request->is(array('post', 'put'))) {
      $this->Post->id = $id;
      if ($this->Post->save($this->request->data)) {
         $this->Session->setFlash(__('Your post has been updated.'));
         return $this->redirect(array('action' => 'index'));
      }
      $this->Session->setFlash(__('Unable to update your post.'));
   }
   if (!$this->request->data) {
      $this->request->data = $post;
   }
}
This action ensures that the user has tried to access an existing record. If they haven’t passed in an $id parameter, we throw a NotFoundException for it.
Next the action checks whether the request is a POST request. If it is, then we use the POST data to update our Post record, or show the user validation errors.
1. Now create an edit view.
<!– File: /app/View/Posts/edit.ctp –>
<h1>Edit Post</h1>
<?php
   echo $this->Form->create('Post');
   echo $this->Form->input('title');
   echo $this->Form->input('body', array('rows' => '3'));
   echo $this->Form->input('id', array('type' => 'hidden'));
   echo $this->Form->end('Save Post');
?>
2. Last you need to update your index view with links to edit on posts.
<!– File: /app/View/Posts/index.ctp(edit links added) –>
<h1>Blog posts</h1>
<?php echo $this->Html->link("Add Post", array('action' => 'add')); ?>
<table>
    <tr>
        <th>Id</th>
        <th>Title</th>
        <th>Action</th>
        <th>Created</th>
    </tr>
<?php foreach ($posts as $post): ?>
    <tr>
        <td><!--?php echo $post['Post']['id']; ?></td>
        <td>
            <?php
                echo $this->Html->link(
                    $post['Post']['title'],
                    array('action' => 'view', $post['Post']['id'])
                );
            ?>
        </td>
        <td>
            <?php
                echo $this->Html->link(
                    'Edit',
                    array('action' => 'edit', $post['Post']['id'])
                );
            ?>
        </td>
        <td>
            <?php echo $post['Post']['created']; ?>
        </td>
    </tr>
<?php endforeach; ?>
</table>
You can check now we have edit action on index page.

Step7 – Deleting Posts
Next, let’s make delete action for users to delete posts. Start with a delete() action in the PostsController.
public function delete($id) {
   if ($this->request->is('get')) {
      throw new MethodNotAllowedException();
   }
   if ($this->Post->delete($id)) {
      $this->Session->setFlash(
         __('The post with id: %s has been deleted.', h($id))
      )
      return $this->redirect(array('action' => 'index'));
   }
}
Now update your index view with links with delete option on posts.
<!– File: /app/View/Posts/index.ctp –>
<?php
   echo $this->Form->postLink(
      'delete',
      array('action' => 'delete', $post['Post']['id']),
      array('confirm' => 'Are you sure?')
   )
?>

<?php
   echo $this->Html->link(
      'Edit',
      array('action' => 'edit', $post['Post']['id'])
   )
?>
You can check now we have delete and edit both action on index page.

Here you have done with basic CakePHP working process. We can add, edit and delete posts in simple steps for better user friendly blog.
CakePHP has flexible way for building more feature-rich applications. Start learning more about Cookbook and API.
Summary
This article can raise your interest towards CakePHP. This is very simple and easy to follow steps to creating blog. Also you can see the codes and output too for understanding more about work.
Hopefully this article helps you to accomplish your knowledge for CakePHP installation.
About Author
Hi, I am Roshni Sharma perusing Web Master Course at Admec Multimedia Institute. I had an article to write about CakePHP installation and working way. I tried to make this article informative and helpful for the readers.
Hope you like my article. For any query you can comment here. I’ll answer you asap.