Steps to build forms in HTML and style using CSS – Blog at Web Development Institute
In today’s time, information is key, which is why Forms are one of the most important parts of a website. Be it any kind of site, we need forms to create account, ask for user information and much more.
Different types of forms that one might come across on a website are registration forms, newsletter subscription forms, payments forms, feedback forms, surveys, contact form, etc.
Now if you are curious about the development of these types of forms then this blog is surely made available for you by Web Development Institute. This blog throws light on the key steps to follow to build forms in HTML5. Not only this we will also take a look at the styling part in CSS by following the essential steps.
If you have doubt like why do we always use HTML and CSS for building forms then let me clear your doubt first.
Why use HTML for developing forms?
HTML is standard website development language. It is the main language that describes the structure of any web page and its elements. You can’t just think about designing forms to collect data from users without using HTML.
HTML Elements Used to Create a Form
1. Form Tag
Following are the main elements used in creating an HTML Form:
As may seem obvious, the tag used to create a form is <form>!
Along with form tag, we have a “method attribute” that specifies how data entered in the form is sent to server.
Also, it is important to know the type of methods that we use with this form tag. These methods are get and post. It is important to know that “get” method attribute is default. The main difference between both is that ‘get’ appends data in the URL, whereas ‘post’ does not append data in the URL, hence is more secure.
Input Element
The input element is used to input information from our user into the web page. For example the very basic input elements required in a registration form are First name, Last name, and Email address. We got more input elements too.
The different input types of input elements used in a form are text, email, number, checkbox, radio button and button, which we will see later with example.
Label Element
Label element is used to label the input elements. In other words it links a label to an input field using the id of the input field. So even if the user clicks on a label, the respective input field will be highlighted. See the image given below for reference. Using label element is really helpful for our website users.
Please note that if your HTML basics aren’t strong then please consider improve them first. For that Web Development Institute offers a HTML5 & CSS3 course that covers the training from scratch.
Now, coming on the main point of this blog. Let’s know the way to build forms in HTML.
Follow Steps to Create a HTML Form
We will see the steps to create form along with an example of the most commonly used form type i.e. Registration Form. We are creating a registration form to get register for an art program.
Now start creating form with me by follow the below given steps.
1. Create an HTML document
Create a container for the form and give relevant heading
Using <form> tag, we will start creating the form.
<section class="form">
      <section class="title">
        <h3>Registration Form</h3>
      </section>
      <section class="registration-form">
        <form>

        </form>
      </section>
    </section>
We can add the method attribute to the form tag as below:

<form method=”get”></form>
<form method=”get”></form>
However for designing purpose, we can skip it.
2. Adding input fields
Create the basic input fields for First Name, Last Name and Email using the input element. For each input field we must be explicit to specify the input type. The input type is very versatile. For example, for the email field, input type “email” is used which checks for the ‘@’ symbol, for password field we have the input type “password” which hides the characters being entered.
3. Now add required attribute
For the fields we do not want to be blank, “required” attribute is used in the input tag. This will help us in telling users that they can’t leave the particular field empty or blank by providing a message.
4. Add Placeholder text
It is another useful value to be used with input field. You can use it to put any text inside the textbox, which will be visible until input is entered. It helps the users know a little bit more about the input field and what they want to enter there.
5. Linking input fields to labels
To link the input fields and respective label, we will provide Id to the input fields and the same Id will be used in the “for” attribute of the <label> tag.
Now if we click on the label, it is going to highlight the input element that that label is for.
<form>
          <div>
            <label for="f-name">First Name :</label>
            <input type="text" id="f-name" placeholder="Enter First Name" required />
          </div>
          <div>
            <label for="l-name">Last Name :</label>
            <input type="text" id="l-name" placeholder="Enter Last Name" required />
          </div>
          <div>
            <label for="e-mail">Email :</label>
            <input type="email" id="e-mail" placeholder="Enter Email Address" required />
          </div>
 </form>
We will get the following output:

Similarly create the Password field with the input type password.
<div>
            <label for="password">Password :</label>
            <input type="password" id="password" required />
 </div>
6. Adding radio buttons to the form
Now we will add the Gender field for which the input type is Radio Button.
Okay, let’s know what radio button is exactly.
A radio button has multiple options that share a same name, which is how we know that only one option will be selected.
Having exact same name means only one option can be selected at a time as opposed to selecting multiple options using checkbox.
If we want any value to be pre-selected, we can use “checked” attribute at the end of the input tag.
Additionally we need to specify the value, which is required when we are submitting the form. You can follow the below given code.
<div class="gender">
            <div>
                <label for="male">Male</label>
                <input type="radio" id="male" value="male" name="gender" />
            </div>
            <div>
                <label for="female">Female</label>
                <input type="radio" id="female" value="female" name="gender" checked />
            </div>
            <div>
                <label for="other">Female</label>
                <input type="radio" id="other" value="other" name="gender" />
            </div>
 </div>
Check the reference image below.

7. Age field
Create the Age field and give it the input type as “number”. Why adding the number input type we will make sure that this field will allow numbers only as input. We can use the “min” and “max” attribute to set the minimum and maximum input value allowed.
For example we set min value 1 and max value 200, as the age cannot be a negative number and nobody is aged above 200yrs.
<div>
            <label for="age">Age :</label>
            <input type="number" id="age" min="1" max="200">
  </div>
You will result like the below given image.

8. Adding checkbox field to the form
Another type of input field that is used in a form is a Checkbox. Opposite to radio button, we use checkboxes when we want user to select single or multiple values in the form.
Here we use checkbox to create Preferences field. Also, I’m adding name attribute too.
This will help in identifying the input fields in back-end.
<div>
            <span>Preferences :</span>
            <div>
                <label for="acrylic">Acrylic Painting</label>
                <input type="checkbox" id="acrylic" name="acrylic" />
            </div>
            <div>
                <label for="oil">Oil Painting</label>
                <input type="checkbox" id="oil" name="oil" />
            </div>
            <div>
                <label for="watercolor">Water Color Painting</label>
                <input type="checkbox" id="watercolor" name="watercolor" />
            </div>
   </div>
As you can see in the above mentioned example that the user is able to select a single value as well as multiple values as per his need.
9. Working with select element
Create a drop-down for occupation using the Select element. Though, it’s not an input element but still it actually performs in a similar manner. Using select element we create the drop down inputs and by using the select tag we add options to it.
Here also we need to specify the value field for back-end.
<div>
            <label for="occupation">Select Occupation</label>
            <select id="occupation">
                <option value="student">Student</option>
                <option value="working-professional">Working-Professional</option>
                <option value="business-owner">Business Owner</option>
                <option value="not-working">Not Working</option>
            </select>
  </div>
10. Insert Textarea field
Now we want to give user an area to write his/her Bio. For this, the user needs space to specify lots of text with multiple lines, which is not possible with above input types.
So, now I will use an element known as Textarea here. I’ll use <cols> and <rows> attributes here for specifying the size of a text area. Also, we need to add the name attribute too. Why? Well, because it will use to reference the input data once the form is submitted.
It is re-sizable, which we can later disable through CSS.
<div>
            <label for="bio">Bio</label>
            <textarea name="bio" id="bio" cols="30" rows="5"
             placeholder="share few lines about yourself..."></textarea>
  </div>
Hey, this is the last step to build form in HTML. Lastly, we will create Reset and Submit buttons to reset the data, if the user needs to reset and submit the data to the server.
We can use input type reset and submit for the same, as shown below:
<div>
          <input type="reset" value="RESET" />
          <input type="submit" value="SUBMIT" />
</div>
Now that we have the basic form structure ready, we will style it using CSS.

NOTE: Apart from the above mentioned inputs, there are other types of inputs available like Telephone Number, URL, Date etc.
So, you are free to use them all in your forms depending on the nature of the form you want to build.
Going for some touch-up for our HTML form now.
Follow Steps to Style the Form using CSS
1. Structuring the look of the form
Before giving any style to the form, we need to give a structure to the form. This can be done using table, line breaks or flex box, depending on the final look we want to create.
2. Using flex box
Now here I’m going to take help from flex box in order to structure my form. Wrap all elements in div blocks, assign classes and apply the flex property to display.
Next, wrap all label fields in label class and give it fixed width.

You can also check guide on how to position the elements in HTML and CSS in the right way to understand the concepts.
3. Giving margin and padding
Now, we will give margin and padding to the form and also give border. Here we use the following values:
.form{
    margin: 3rem auto;
    padding: 1rem;
    border: 1px solid black;
    width: 700px;
    height: max-content;
    text-align: center;
    background-image: linear-gradient(rgba(0,0,0,0.65), rgba(0,0,0,0.65),  url("./pexels-     steve-johnson-1145720.jpg"));
    background-size: cover;
    background-repeat: no-repeat;
    color: white;
    font-family: 'Montserrat', sans-serif;
}
To individual fields, give the appropriate margin and padding.
Use the flex property on Gender and Preferences fields to align the options in same line.

4. Adding background image
Give a background image, along with a gradient to make the form look interesting.
5. Adding styling to text
Style the heading font and the font of input fields. Give font-family and font-size for this.
We will get the following result, after applying the above-mentioned steps.
Figure: Form after creating the basic structure.

Figure: Form after giving background image and basic CSS properties for margin, padding and font.

6. Working on inner elements
Now, target the individual input elements to style them. We will make the background transparent, give font color white, and give a white border and border-radius for curved edges.
.form-fields input{
    padding: 5px;
    font-family: 'Montserrat', sans-serif;
    color: white;
    border: 1px solid white;
    background-color: transparent;
    border-radius: 5px;
}
The blue-outline that appears on clicking the input field can be changed or removed using the focus pseudo class on the input field.
.form-fields input:focus{
    outline: 2px solid rgba(21, 130, 150);
    border: none;
}
However, in our example we will let it have default value, as it goes with the form background.
7. Styling the Select dropdown element
Now, we will target the select element and give the border, background and font color values. It is important to target the option tag if you are planning to modify the color of the text in the drop-down menu.
.form-fields select{
    padding: 5px;
    background: transparent;
    color: white;
    border-radius: 5px;
}

.form-fields select option{
    color: black;
 }
8. Styling the Textarea
The important property to set in Textarea is the Resize property. We don’t want the user to resize the text box and for this the resize property must be set to none. The other properties are set similarly as other input fields.
Also use the focus pseudo class to disable the outline on click, if needed.
.form-fields textarea{
    resize: none;
    color: black;
    font-family: monteserrat;
    border-radius: 5px;
    padding: 5px;
 }
9. Styling the buttons
Lastly, we will style the buttons by giving margin and padding values. The desired font properties and the background color. Also we will give the hover property for buttons.
.buttons input{
    padding: 5px 10px;
    font-weight: 500;
    letter-spacing: 1.5px;
    border-radius: 5px;
    margin: 10px;
    cursor: pointer;
    border: none;
 }
 .buttons input:hover{
    background-color: black;
    color: white;
 }
Finally our form is ready!
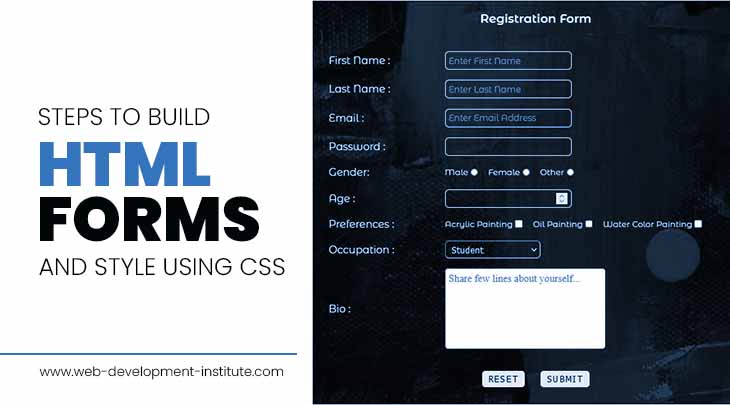
And below is the final look of the form we created, with and without values.


Wrapping Up
I hope with this blog, you will be able to build your own form in HTML and style it using CSS code.
About Author: Hi readers, this is Somya Mathur. I’m a student of 08 months diploma in web designing in Delhi at Web Development Institute in Delhi. I’m very greatful to get this writing opportunity as it gave me a chance to share some of my knowledge with all of you. Thanks for reading this blog.
In order to know more about the courses offered at WDI, please contact Web Development Institute or ring us at +91 9911782350.